

I will give you detailed steps to set either Vim or Neovim as your default editor running in iTerm for file types you configure for your Mac. This means that ever time you’re in Finder (or Pathfinder in my case) and you double-click on, for example, a text .txt file or maybe a JavaScript .js file (you choose) it will pop open a new iTerm terminal window and start up nvim or vim and open that file in NeoVim or Vim with all the trimmings of your environment. When I do this, I like it to open in a new window, but you can have it open to a new tab on an existing window or with a specific iTerm Profile and much more.
How I did it..
You will need iTerm2 for this to work, but it can easily be adopted to MacOS terminal. Let me know if you would like to see that added to this post if you prefer MacOS Terminal. You can also find some details on how to dial in your iTerm config here.
You will also want either NeoVim or Vim 8 or greater to stay sane. I love and use Homebrew to install command line packages and even Mac App Store apps. Here’s a quick script to install Homebrew then iTerm and Neovim. Start up your terminal and run the following commands:
/usr/bin/ruby -e "$(curl -fsSL https://raw.githubusercontent.com/Homebrew/install/master/install)"
brew update
brew upgrade
brew cask install iterm2
brew install neovim
The basic approach is to create an Automator application that takes your finder file as a parameter and then use Finder to set the desired file types to open by default using your new Automator application.
If you want a video overview I’ve thrown up a quick and dirty YouTube walkthrough for you too.
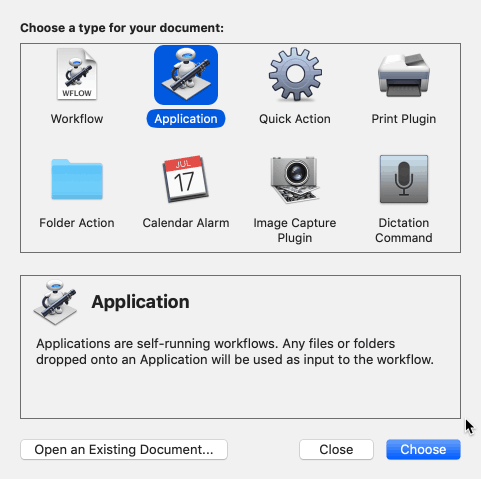
Step One: Create an Automator Application
I will show you how create an app for MacOS that acts as a launcher or façade to iTerm with parameters via AppleScript.
Open Automator and create a new “Application” as shown here.
Now search for the “Run AppleScript” action from the Library as shown here.
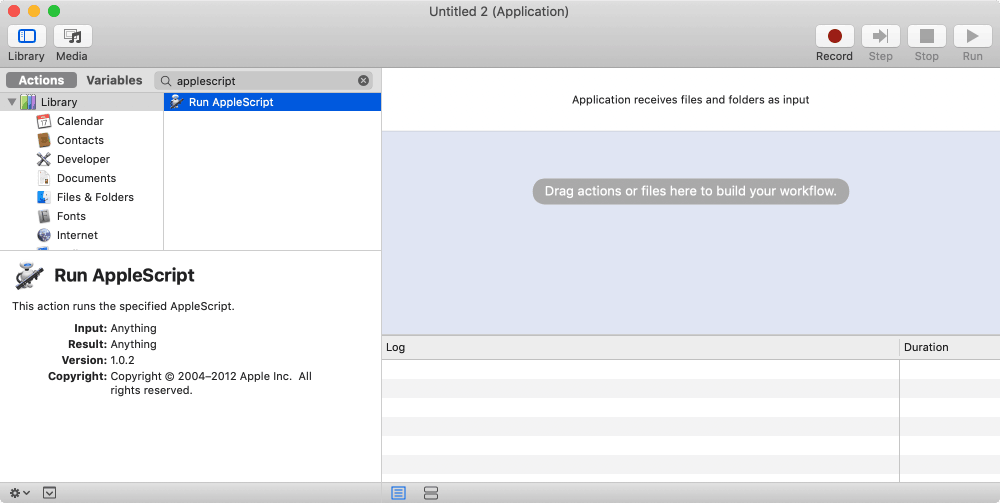
Now we have an Applescript ready to edit. It is time to Save the application either to your /Applications folder or as I do, to my ~/bin folder in my path and name the application something appropriate. I call mine OpenInNeovim.
Step 2: Craft or Copy & Paste your Launcher AppleScript
I found a few Gists that gave me everything I needed and made only minor edits. Here are the two that I based my launcher on. Here’s the gist that has my specific code:
If you want to grab mine as is, you can copy and paste this AppleScript directly into your Automator “Run AppleScript” action as shown here.
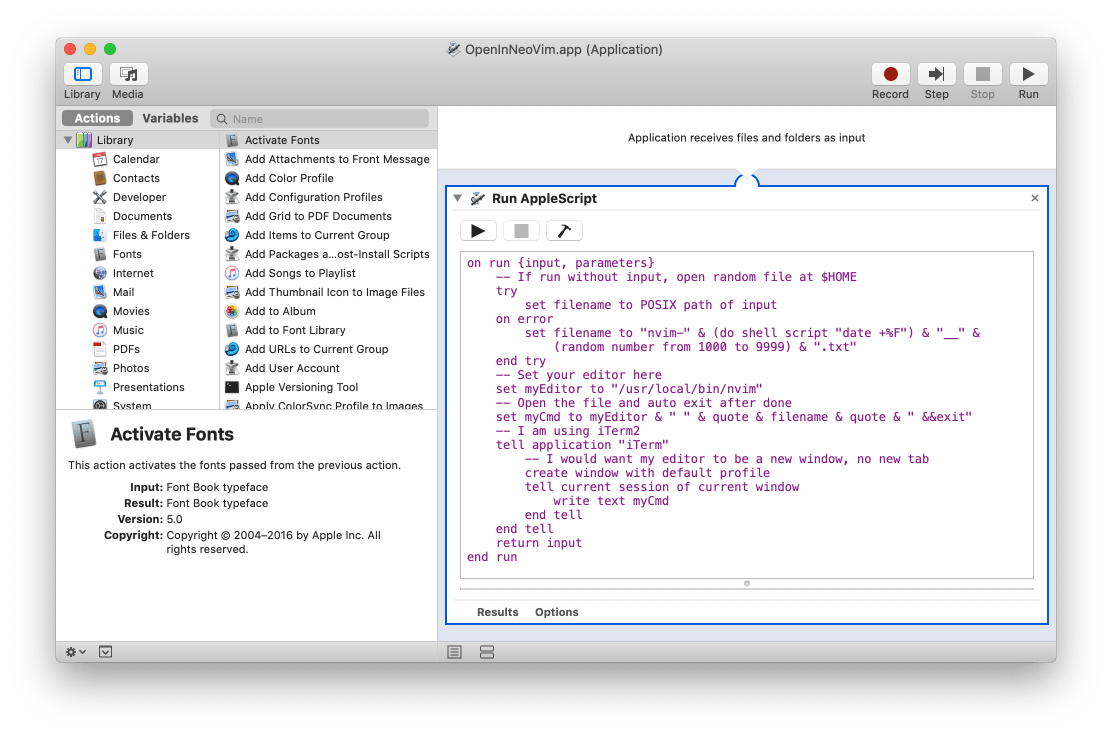
This one from sdkks does a great job creating a default file if you happen to run the app without any parameters. As you can see, mine only varies from this one ever so slightly: mine uses the default profile while his uses a specific profile via: create window with profile "sh"
AppleScript for Automator application to open file in Neovim in an iTerm window. (Raw):
on run {input, parameters}
	-- If run without input, open random file at $HOME
	try
		set filename to POSIX path of input
	on error
		set filename to "nvim-" & (do shell script "date +%F") & "__" & (random number from 1000 to 9999) & ".txt"
	end try
	-- Set your editor here
	set myEditor to "/usr/local/bin/nvim"
	-- Open the file and auto exit after done
	set myCmd to myEditor & " " & quote & filename & quote & " &&exit"
	tell application "iTerm"
		create window with default profile
		tell current session of current window
			write text myCmd
		end tell
	end tell
	return input
end run
Link to Gist OpenInNeoVim.applescript (view raw)
Finally, I need to share the original gist from charlietran that sdkks adopted and embeds the basic instructions I expand on in this post:
Step 3: Set File Types to open using your new Application
The final step to enable the basic functionality; when you double click on a file of the type you want in Finder, it will open an iTerm window and execute nvim with the file a parameter.
To do this we need to use Finder to find a file of each type you want to default to open with Neovim in iTerm. Then we will change the association in MacOS for that file that might already exist to point to our new application.
Let’s do that now, open a Finder window and in the Search bar type in the following exactly: kind:text
This will return not just files ending in .txt, but all files that Finder understands as being of the basic text format. That means files like these will show up in your list:
- .txt
- .java
- .json
- .html
- md (markdown)
- .rtf
- .svg
- .css
- .js (JavaScript)
- .py (Python source)
- .vim (your viml config files)
- .csv (comma separated values)
- .rtf
Obviously we do not want to use NeoVim to open all these by default (especially not rtf!), but for those that we do we can change their Finder open association to our new Automator App.
Select the first one in finder and type CMD+i and the Info panel for that file will pop up. Expand the “Open with:” section and you will see what app currently will open that file when you double click it.
Click the application that currently is listed (e.g. Text Edit) and it will expand the list to the full menu. If you put your new app in the /Applications folder, it might show up on this list, but not likely yet! Instead you will likely need to scroll that list all the way to the bottom and click on “Other…”
Now you should have the file selector open to the /Applications folder. You can either scroll to it and select your new Automator app if you happened to save it here, or you can navigate to its location, or you can use the search bar if Spotlight has been so kind as to keep up with your actions thus far. Select it and will now open that fine, and that file only, with your new app. To change it so that all files of that type will open with your new façade, you need to click the button that says “Change All…” directly below the app selection.
Test and Security
Now you want to test that things are working as you planned and take care to consider the security warning that MacOS provides you the first time you try to run the new Automator app: I strongly suggest you understand the AppleScript provided above and anything you do not, trim down to the essentials and test.
Some iTerm2 Configuration Hints for MacOS
You might want to differ the iTerm UI for opening files from the Finder. To do this, just create a new iTerm “Profile” from the “Profiles” tab in preferences. You can see the tab here:

If you found this curiously interesting you might be interested in my post on how to replace the MacOS Terminal app with iTerm and have great configuration, check my related post here.
Please let me know if you have any questions or clarifications, or would like to see a related post below in the comments.